KNIMEのworkflowをコマンドで実行(batch mode) Execution KNIME workflow via command line.
KNIMEのworkflowをコマンドで実行(batch mode) Execution KNIME workflow via command line.
KNIMEを利用すれば繰り返しのデータ分析を自動化することが可能。
以下は、あらかじめ作ってあるKNIMEのワークフローをコマンドで実行する手順。
コマンドで実行できるので、他システムから呼び出すことが容易になる。
If you use KNIME, you can automate repetitive data analysis.
This is a procedure that execute a already exist workflow of KNIME via command line.
The execution via command line make it easier to access KNIME from other system.
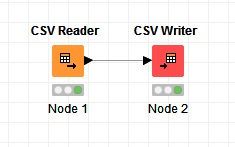
特定のcsvファイルを読み込み、その内容を特定の場所へcsvファイルで出力するだけの単純なワークフロー。
これを保存し、以下のコマンドを実行する。
This simple workflow read a specific csv file and write same data to specific path.
You execute following command to execute this workflow.
knime.exe -consoleLog -noexit -nosplash -reset -application org.knime.product.KNIME_BATCH_APPLICATION -workflowDir="ディレクトリのパス"


"-consoleLog"がないと、コンソールが起動しない。If you don't write "-consoleLog", console window doesen't wake up.
"-noexit"がないと実行完了後コンソールが終了する。If you don't write "-noexit", console window will shut donw after execution.
linux環境では"knime.exe"->"knime"で起動できる。(未検証)In linux envinronment, you use "knime" insted of "knime.exe".(not validation)
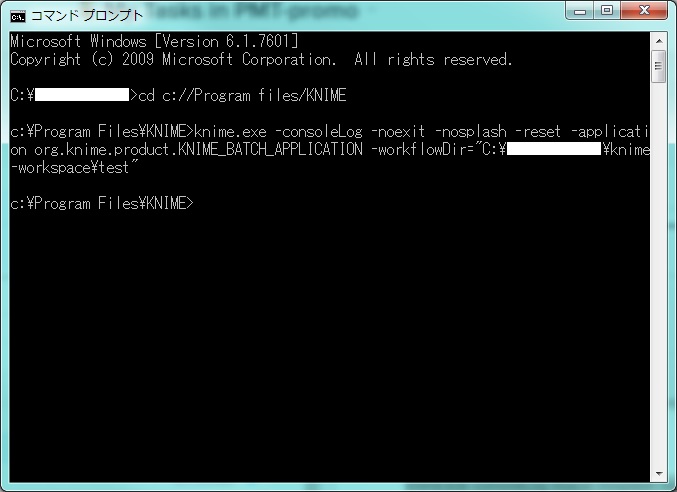
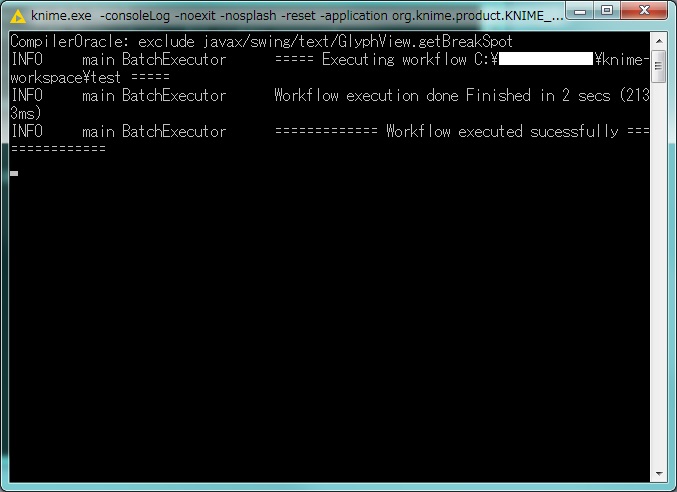
実行すると下図のコンソールが立ち上がり実行結果が表示される。
When you execute the command, console window will wake up and show result of execution.
詳しく調べていないが引数でパスを渡して扱うファイルを指定することも可能。
(workflow variableを利用する)
You can pass a file path as argument to KNIME.
But I haven't researched the detail of command.(to use workflow variable)
KINME:https://www.knime.org/
linuxにtomcat8環境を構築
最終的に、以下を行いたい
1.start,stop,restartとstdoutのlogのコマンド
2.サーバ起動時にtomcat自動起動
3.warファイルデプロイディレクトリの確認
4.ライブラリ配置ディレクトリの確認
0.準備(インストール)
ユーザ追加
# useradd -s /sbin/nologin tomcat
ダウンロード(バージョンは8.0.30)
# wget http://ftp.jaist.ac.jp/pub/apache/tomcat/tomcat-8/v8.0.30/bin/apache-tomcat-8.0.30.tar.gz
解凍・ディレクトリ移動
# tar -xzvf ~/apache-tomcat-8.0.30.tar.gz
# mkdir /opt/apache-tomcat-8.0.30
# mv ~/apache-tomcat-8.0.30 /opt/apache-tomcat-8.0.30
# chown -R tomcat:tomcat /opt/apache-tomcat-8.0.30
パス追加
# CATALINA_HOME=/usr/local/tomcat
# export CATALINA_HOME
起動・停止のテスト
この前に、opt内にapache-tomcatというリンクをapache-tomcat-8.0.30に貼っておくと便利
起動
# sudo -u tomcat /opt/apache-tomcat/bin/startup.sh
停止
# sudo -u tomcat /opt/apache-tomcat/bin/shutdown.sh
1.サーバ起動時にtomcat自動起動
以下のスクリプトを/etc/init.d/tomcatで作成
#!/bin/bash
#
# Startup script for the Tomcat Servlet Container
#
# chkconfig: 2345 35 65
# description: Tomcat is the servlet container that is used in the official \
#              Reference Implementation for the Java Servlet and JavaServer \
#              Pages technologies

TOMCAT_USER=tomcat
CATALINA_HOME=/usr/local/tomcat

. /etc/rc.d/init.d/functions
prog=tomcat

start() {
    echo -n $"Starting $prog: "
    daemon --user $TOMCAT_USER $CATALINA_HOME/bin/startup.sh > /dev/null
    RETVAL=$?
    if [ $RETVAL -eq 0 ]; then
        echo_success
    else
        echo_failure
    fi
    echo
    [ $RETVAL = 0 ] && touch /var/lock/subsys/$prog
    return $RETVAL
}
stop() {
    echo -n $"Stopping $prog: "
    daemon --user $TOMCAT_USER $CATALINA_HOME/bin/shutdown.sh > /dev/null
    RETVAL=$?
    if [ $RETVAL -eq 0 ]; then
        echo_success
    else
        echo_failure
    fi
    echo
    [ $RETVAL = 0 ] && rm -f /var/lock/subsys/$prog
    return $RETVAL
}

# See how we were called.
case "$1" in
  start)
    start
    ;;
  stop)
    stop
    ;;
  restart)
    stop
    start
    ;;
  status)
    INSTANCES=`ps --columns 512 -aef|grep java|grep tomcat|grep org.apache.catalina.startup.Bootstrap|wc -l`
    if [ $INSTANCES -eq 0 ]; then
        echo $prog is stopped
        RETVAL=3
    else
        if [ $INSTANCES -eq 1 ]; then
            echo $prog is running 1 instance...
        else
            echo $prog is running $INSTANCES instances...
        fi
        RETVAL=0
    fi
    ;;
  *)
    echo $"Usage: $prog {start|stop|restart|status|help}"
    exit 1
esac

exit $RETVAL
実行権限追加
# chmod +X /etc/init.d/tomcat
起動時に、実行されるよう設定
# /sbin/chkconfig --add tomcat
2.start,stop,restartとstdoutのlogのコマンド
/etc/init.d/にスクリプトを登録したので、起動などはそちらを実行すればよい
起動
# service tomcat start
停止
# service tomcat stop
再起動
# service tomcat restart
ログはデフォルトの設定でlogs内に標準出力が出力されるようになっているのでそちらを利用する
# tailf /opt/apache-tomcat/logs/catalina.out
3.warファイルデプロイディレクトリの確認
4.ライブラリ配置ディレクトリの確認
それぞれ以下、
デプロイ
$CATALINA_HOME/webapps
ライブラリ
$CATALINA_HOME/lib
再起動の必要有無は未確認
参考:
http://homepage1.nifty.com/y-osumi/works/code/tomcat7/http://weblabo.oscasierra.net/installing-tomcat7-on-redhat/
Eclipseでリモート環境にデプロイ(WildFly,JBossツール)
WildFly・JBossではあるバージョンから(6?)JBossツールを利用して、リモート環境へのデプロイができる。
以下その手順。
1.Eclipse・JBossツールのインストール
2.リモートシステムの設定
3.サーバーの設定
1.Eclipse・JBossツールのインストール
Eclipse・JBossツールのインストールについては、WildFly・JBossをローカル環境で扱う方法として、記事がいくつも公開されているので説明はそちらに譲る。
例えば、
http://www.javadera.com/blog/hellowildfly/
http://itmemo.net-luck.com/eclipse-jboss-environment/
http://qiita.com/yu_naka0607/items/c3441175a90be72c2b6f
2.リモートシステムの設定
まず、どのリモート環境を扱うかをEclipseで設定する
2-1.リモートシステムをビューへの表示
ウィンドウ->ビューの表示->その他->リモート・システム->リモート・システム
2-2.リモートシステム→新規接続
今回はSSHによる接続を行う。

2-3.環境のIPを入力→完了

2-4.ビューに追加したリモートシステムが追加されている。
接続を試す。

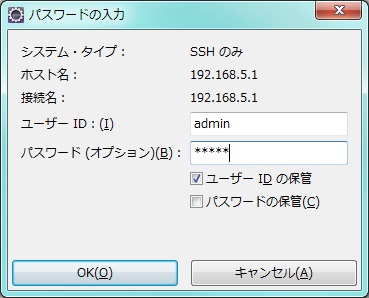
2-5.ID・PASSを入力し正しく接続されればOK
3.サーバーの設定
設定したリモートシステムに入っているWildFlyをサーバー設定する。
3-1.新規サーバーから対象のサーバーをバージョンを選択

3-2.サーバーをリモートにして、ランタイムもリモートのものを利用するので、チェックを外す。
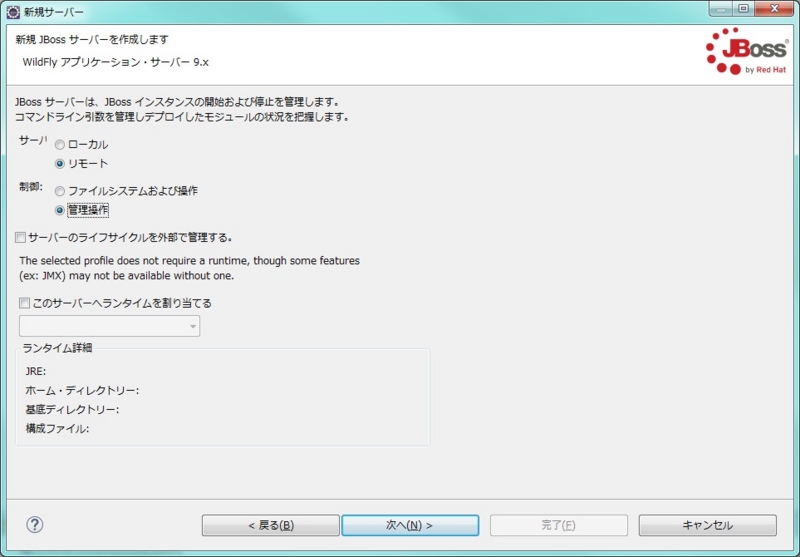
3-3.設定したリモートシステムを選択し、WildFlyのインストールディレクトリを選択する。

JBoss5でユーザー認証(BASIC認証・DIGEST認証・FORM認証)を行う
WEBアプリでサーバーにユーザ認証をまかせるとき、TomcatとJBossとではサーバー側の設定が少し異なる。
JBossのバージョン情報:
Name: JBoss SOA-P 5 (development)
Version: 5.3.0.GA
Description: JBoss Enterprise SOA Platform
設定すべきファイルは以下の4つ
JBoss側の設定ファイル
1.sample-ds.xml(sample部は任意)
datasouce(例えば、データベース)への接続方法を記述
2.login-config.xml
1.のdatasourceを利用した認証方法を記述
WEBアプリ側の設定ファイル
3.jboss-web.xml
2.との接続を記述
4.web.xml
認証方法を記述
JBoss側の設定
1.sample-ds.xml(sample部は任意)
$JBOSS_HOME/server/development/deploysample-ds.xml を作成
<?xml version="1.0" encoding="UTF-8"?>

<!-- $Id: mysql-ds.xml 63175 2007-05-21 16:26:06Z rrajesh $ -->
<!--  Datasource config for MySQL using 3.0.9 available from:
http://www.mysql.com/downloads/api-jdbc-stable.html
-->

<datasources>
  <local-tx-datasource>
    <jndi-name>sampleDS</jndi-name>
    <connection-url>jdbc:mysql://mysqldb:3306/sample?autoReconnect=true</connection-url>
    <driver-class>com.mysql.jdbc.Driver</driver-class>
    <user-name>user</user-name>
    <password>pass</password>
    <metadata>
       <type-mapping>mySQL</type-mapping>
    </metadata>
  </local-tx-datasource>
</datasources>
「jdbc:mysql://mysqldb:3306/sample?autoReconnect=true」はデータベースのurl
2.login-config.xml
$JBOSS_HOME/server/default/conf/login-config.xml に追記
<application-policy name = "sampleAuth">
  <authentication>
    <login-module code = "org.jboss.security.auth.spi.DatabaseServerLoginModule"
      flag = "required">
      <module-option name = "dsJndiName">java:/sampleDS</module-option>
      <module-option name="principalsQuery">
        select password from user_info where user_name=?
      </module-option>
      <module-option name="rolesQuery">
	 select role , 'Roles' from user_info where user_name=?
      </module-option>
    </login-module>
  </authentication>
</application-policy>
user,passのデータベース作成については下部の参考2を参照(参考2中のrolesQueryの文法に誤りがあるので注意)
テーブルの構成に応じてクエリは変更が必要
WEBアプリ側の設定
3.jboss-web.xml
/WEB-INF/jboss-web.xml を作成
<?xml version="1.0" encoding="UTF-8"?>
<jboss-web>
    <!-- Use the JaasSecurityMgr other security domain for authentication
      and authorization of secured web content.
     -->
    <security-domain>java:/jaas/sampleAuth</security-domain>
</jboss-web>
sampleAuthは2.で設定したJNDI
4.web.xml
/WEB-INF/web.xml に追記
<security-constraint>
  <web-resource-collection>
    <web-resource-name>Protected Area</web-resource-name>
    <url-pattern>/</url-pattern>
  </web-resource-collection>
  <auth-constraint>
    <role-name>user</role-name>
  </auth-constraint>
</security-constraint>


<login-config>
  <auth-method>FORM</auth-method>
  <realm-name>User Form Auth</realm-name>
  <form-login-config>
    <form-login-page>/login.html</form-login-page>
    <form-error-page>/error.html</form-error-page>
  </form-login-config>
</login-config>

<security-role>
  <role-name>user</role-name>
</security-role>
他の認証方式(BASIC認証・DIGEST認証)を利用したい時はauth-methodを変更
参考にしたサイト:
参考1https://access.redhat.com/documentation/ja-JP/JBoss_Enterprise_Application_Platform/5/html/Security_Guide/ch12.html
参考2JBoss各種Tips
pythonによる強調フィルタリング手法GroupLensの実装
レコメンドシステム構築の為、まずは定番のGroupLensの実装を行った。
python(crab)でもR(recommenderlab)でもライブラリはあるようだが、
さして複雑なアルゴリズムではないので、使いこなすより実装した方が早いと判断し、
pythonによる実装を試みた。
アルゴリズムは参考1のP50-56を利用している。
例題も同著の以下のデータを利用。

# -*- coding: utf-8 -*-
import numpy as np

def pearson(e1,e2):
    #入力されたリストのうち、どちらともゼロでない要素のみの相関係数を算出
    te1=[]
    te2=[]
    tmp=np.array(e1)*np.array(e2)
    for i in range(len(tmp)):
        if tmp[i]!=0:
            te1.append(e1[i])
            te2.append(e2[i])
    if len(te1)==1:
        return 0
    return np.corrcoef(te1,te2)[0,1]

def average(e):
    #入力されたリストのうち、ゼロでない要素のみの平均を算出
    n = sum(e)
    d = len([x for x in e if x!=0])
    return n/d

def evaluate(a,y,data,arr):
    #評価推定値を算出
    aveA = average(data[a])
    d=0
    n=0
    for i in range(len(data)):
        if a!=i and data[i][y]!=0:#a自身と、yの評価値がないユーザを除く
            d+=abs(arr[a][i])
            # tmp=np.array(data[a])*np.array(data[i])
            # tmp2 = [0 for i in range(len(data[i]))]
            # for k in range(len(tmp)):
            #     if tmp[k]!=0:
            #         tmp2[k]=data[i][k]
            # n+=arr[a][i]*(data[i][y]-average(tmp2))

            #共通要素以外も含めた平均を利用、上部コメントアウト部分は共通要素を除いた平均を利用した場合
            n+=arr[a][i]*(data[i][y]-average(data[i]))
    return aveA+n/d


data = [[0 for i in range(4)] for j in range(4)]
arr = [[0 for i in range(4)] for j in range(4)]
eva = [[0 for i in range(4)] for j in range(4)]

# データの入力
data[0]= [1,3,0,3]
data[1]= [0,1,3,0]
data[2]= [2,1,3,1]
data[3]= [1,3,2,0]


# ユーザー間の類似度計算
for key in range(len(data)):
    base_customers = data[key]
    for key2 in range(len(data)):
        if key == key2:
            continue
        target_customers = data[key2]
        j = pearson(base_customers, target_customers)
        arr[key][key2] = j

#ユーザ・商品ごとの評価値推定
for i in range(len(data)):
    for j in range(len(data[i])):
        eva[i][j] = evaluate(i,j,data,arr)

# ユーザー間の類似度
print(' \t  1 \t  2 \t  3 \t  4 ')
print('1\t{0:2.2f}\t{1:2.2f}\t{2:2.2f}\t{3:2.2f}'.format(arr[0][0], arr[0][1], arr[0][2], arr[0][3]))
print('2\t{0:2.2f}\t{1:2.2f}\t{2:2.2f}\t{3:2.2f}'.format(arr[1][0], arr[1][1], arr[1][2], arr[1][3]))
print('3\t{0:2.2f}\t{1:2.2f}\t{2:2.2f}\t{3:2.2f}'.format(arr[2][0], arr[2][1], arr[2][2], arr[2][3]))
print('4\t{0:2.2f}\t{1:2.2f}\t{2:2.2f}\t{3:2.2f}'.format(arr[3][0], arr[3][1], arr[3][2], arr[3][3]))

#ユーザ・商品ごとの評価値推定値
print(' \t  1 \t  2 \t  3 \t  4 ')
print('1\t{0:2.2f}\t{1:2.2f}\t{2:2.2f}\t{3:2.2f}'.format(eva[0][0], eva[0][1], eva[0][2], eva[0][3]))
print('2\t{0:2.2f}\t{1:2.2f}\t{2:2.2f}\t{3:2.2f}'.format(eva[1][0], eva[1][1], eva[1][2], eva[1][3]))
print('3\t{0:2.2f}\t{1:2.2f}\t{2:2.2f}\t{3:2.2f}'.format(eva[2][0], eva[2][1], eva[2][2], eva[2][3]))
print('4\t{0:2.2f}\t{1:2.2f}\t{2:2.2f}\t{3:2.2f}'.format(eva[3][0], eva[3][1], eva[3][2], eva[3][3]))
- 実行結果
 	  1 	  2 	  3 	  4
1	0.00	0.00	-1.00	1.00
2	0.00	0.00	1.00	-1.00
3	-1.00	1.00	0.00	-0.50
4	1.00	-1.00	-0.50	0.00
 	  1 	  2 	  3 	  4
1	1.71	3.21	1.71	3.08
2	2.62	1.12	2.62	1.25
3	2.97	0.88	2.42	1.08
4	1.03	2.82	0.92	2.69
以上。
参考1:推薦システムのアルゴリズム
www.kamishima.net/archive/recsysdoc.pdf
消費者来店行動モデルのパラメータ推定(poisson分布)
ここでは実店舗が存在し、商品を販売する小売業を想定している。
このとき消費者の来店間隔はポアソン分布に従うと知られている。(阿部2007)
これは、消費者ごとに毎日一定確率で来店し、それが繰り返されているというモデルである
(来店間隔の最小単位を1日とする。)
「消費者ごと」の一定確率を実績から推定する方法を考えたい。

ポアソン分布のパラメータはλのみであり、これを推定すればよい。

これは期間中の平均来店実績に他ならない。
つまり、来店日数/観測日数 で算出できる
参考:
阿部誠(2007)消費者行動理論にもとづいた個人レベルの RF 分析:階層ベイズによる Pareto/NBD モデルの改良,MMRC Discussion Paper No. 18

